GENEVO PRO II
USER and INSTALLATION MANUAL
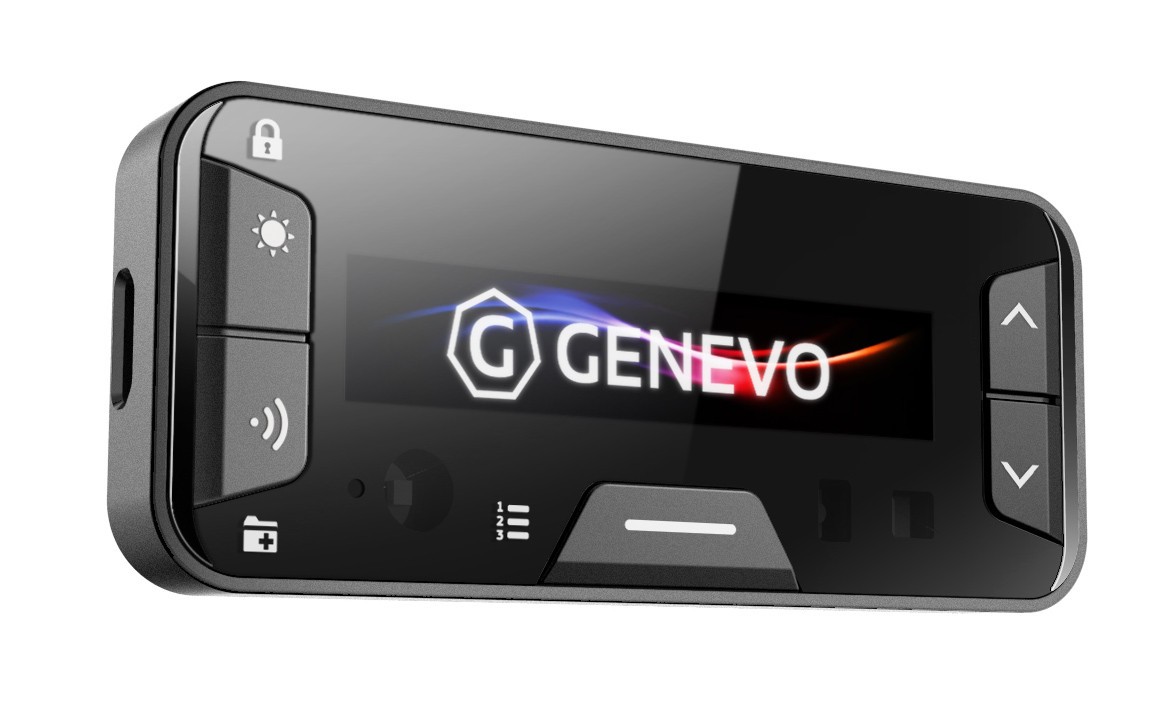
CONGRATULATIONS ON PURCHASING GENEVO PRO II, THE WORLD´S MOST ADVANCED RADAR DETECTOR.
MAIN FEATURES OF GENEVO PRO II:
GENEVO PRO II is our most advanced built-in radar detector, with modern automatic features. It is designed primarily to protect the driver from unnecessary penalties for speeding thanks to reliable detection of:
- Microwave radars (K, Ka).
- MultaRadars CT and CD.
- Gatso RT3 and RT4 radars.
- Red-light cameras.
- Stationary speed cameras.
- Section speed cameras (using GPS updatable database).
Use the device only in accordance with the user manual. Never use a damaged device!
ADVANCED FEATURES:
- A magnetic display, easily removable for instant deactivation of the system.
- Motion sensor for contactless operation. Silence the alert without having to search for the right button.
- Ambient light sensor for automatic brightness adjustment. The display automatically adjusts the brightness according to the amount of light in the cabin.
- Noise sensor in the cabin. The detector automatically adjusts the alert volume according to the level of noise inside the vehicle.
ALERT INTERPRETATION:
In the case of a radar alert, a visual warning appears on the display. A voice refers to the radar band and the intensity of the intermittent tone (beep) expresses the strength of the received signal. The signal strength has nine levels for better distance expression. GPS points are reported verbally, such as “section speed cameras”.
QUICK GUIDE
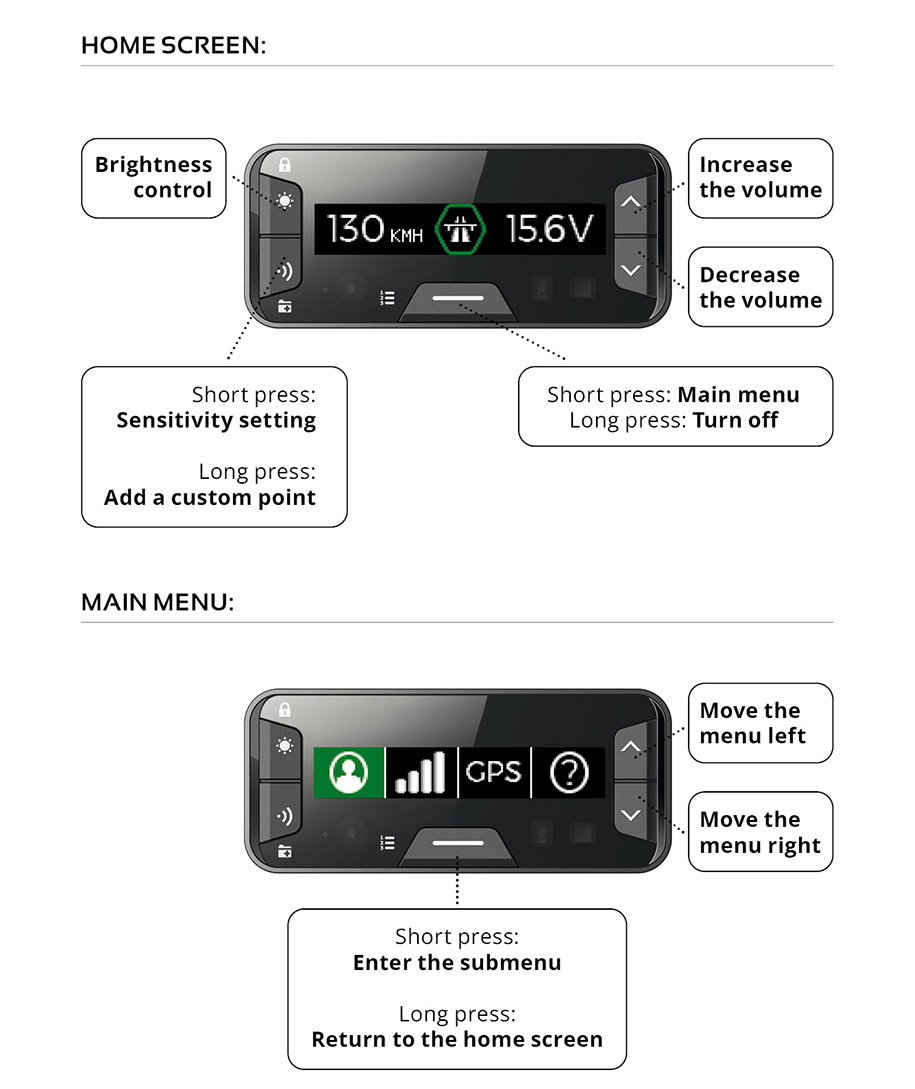
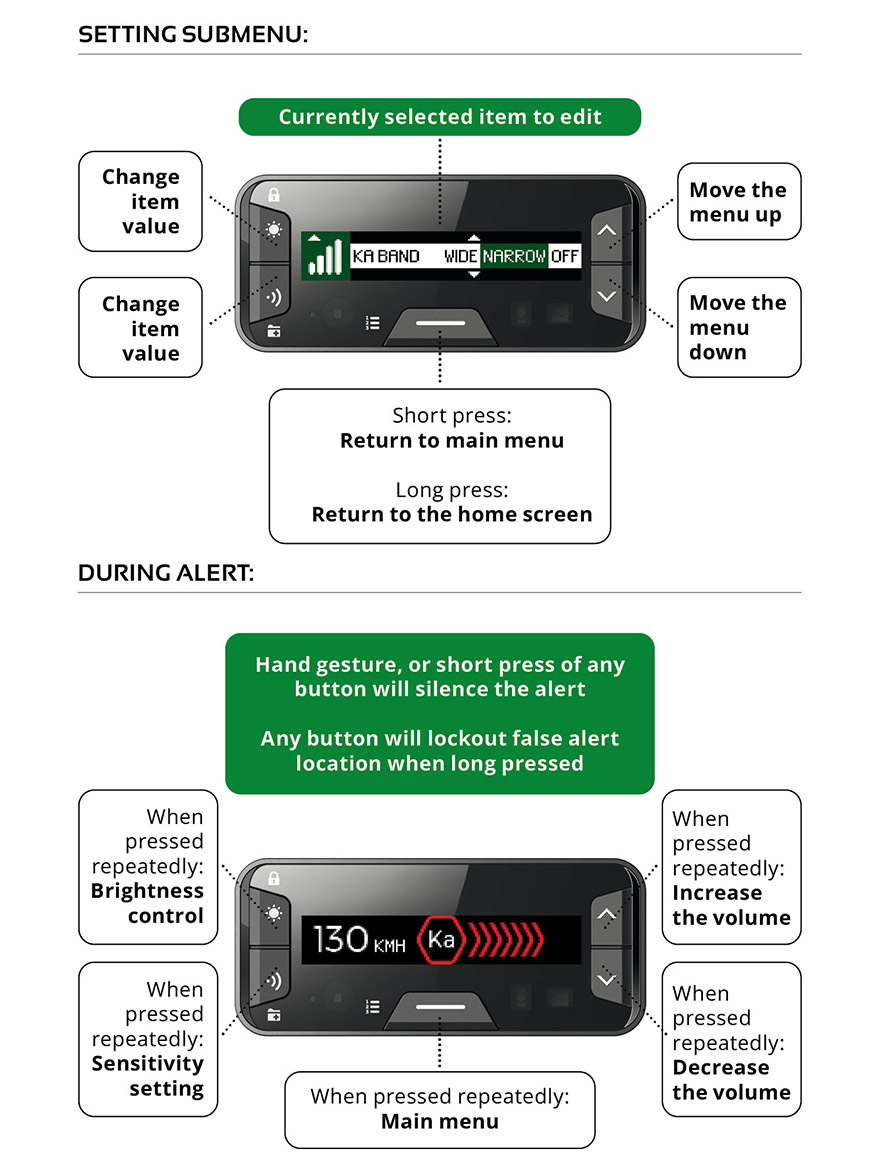
MAIN MENU ITEMS
USER INTERFACE SETTINGS:

DISPLAY: Setting the information displayed on the right side of the display:
- Time 24h - Displays time in 24h format.
- Voltage - Displays the battery voltage.
- Compass - Displays driving direction.
- Time AM/PM - Displays time in 12h format.
TIME: Set local time zone.
STARTUP SOUND: ON/OFF
GPS STATUS SOUND: ON/OFF. Notification of GPS connection/disconnection status
ALERTS: Set the alert type.
- VOICE PRIORITY - The detector announces the detected band first, then beeps according to the alert intensity.
- BEEP PRIORITY – The detector first starts beeping, then announces the detected band and then continues beeping.
- BEEP ONLY – The detector only beeps with the relevant band tone but does not report the detected band type.
AUTO MUTE: ON/OFF. Automatically reduces the volume of alert messages after 5 seconds.
K TONE: 1-15 - Options for selecting different alert tone.
KA TONE: 1-15 - Options for selecting different alert tone.
MD TONE: 1-15 - Options for selecting different alert tone.
MT TONE: 1-15 - Options for selecting different alert tone.
G3 TONE: 1-15 - Options for selecting different alert tone.
G4 TONE: 1-15 - Options for selecting different alert tone.
PR TONE: 1-15 - Options for selecting different alert tone.
PH TONE: 1-15 - Options for selecting different alert tone.
RF TONE: 1-15 - Options for selecting different alert tone.
DH TONE: 1-15 - Options for selecting different alert tone.
LASER TONE: 1-15 - Options for selecting different alert tone.
- These options allow you to choose different sound for each band separately.
AUTO VOLUME: ON/OFF. Automatically adapts the selected volume to the noise in the vehicle cabin.
MOTION SENSOR: ON/OFF
- Selecting “ON” opens the motion sensor sensitivity settings:
SENSITIVITY: LOW/NORMAL/HIGH
UNITS: METRIC/ENGLISH
LANGUAGE: ENGLISH/ÈESKÝ
UPDATE ALERT: ON/OFF - Alerts you on startup when the detector database is out of date.
FACTORY RESET Returns to factory settings.
ALL USER AREAS DELETED: Deletes all saved user areas.
LOCKOUT RESET: Deletes all false alert locations (lockouts).
ALERTS NOTIFICATION SETTINGS:

Recommended settings for European countries can be found at: Support - Recommended settings
FRONT RADAR: ON/OFF
REAR RADAR: ON/OFF (Turn on only when your GENEVO PRO II is equipped with additional rear radar Antenna)
SENSITIVITY:
- HIGHWAY - Maximum detector sensitivity.
- CITY - Reduced sensitivity. We recommend using the reduced sensitivity only in the case of frequent alerts on a certain band (e.g. when driving abroad with frequent false alerts on the K band).
- AUTO CITY - Automatically changes the maximum and reduced sensitivity depending on the speed.
CITY:
- Sets the limit of reduced sensitivity. (E.g.: If you of ten encounter false alerts on the K band with signal strength 2 when driving through the city, then set K2, the detector will not warn of any signal lower than and equal to the set intensity, OFF will turn off this band in reduced sensitivity).
- CITY K LEVEL: 0–9/OFF
- CITY KA LEVEL: 0–9/OFF
ACITY (AUTO CITY):
- This feature enables the sensitivity limit on the K, and Ka bands within the speed range set by ACITY Speed (see ACITY Speed below)
- ACITY K LEVEL: 0–9/OFF
- ACITY KA LEVEL: 0–9/OFF
ACITY (AUTO CITY) SPEED:
- Automatically adjusts sensitivity to you speed. E.g. When the lower speed is set to 30 km/h and the higher speed to 50 km/h the detector will not notify you of any signal at speeds of less than 30 km/h, at speeds of 30-50 km/h, the detector will notify you according to the ACITY setting, and when driving at speeds over 50 km/h, the detector will automatically notify you with maximum sensitivity.
ACITY SPEED LIMIT LOW: 0-100 KM/H
ACITY SPEED LIMIT HIGH: 40-130 KM/H
MIN SPEED: OFF/10-130KM/H
- Sets the minimum speed at which the detector starts to alert on radars. E.g. when set to 20KM/H, the detector will only start to warn when this speed is exceeded.
FRONT ANTENNA SETTINGS:

REAR ANTENNA SETTINGS:

The following settings apply separately to the front and rear radar antennas (if used)
K BAND: NARROW/WIDE/OFF
K FILTER: HIGH/LOW/OFF
KA BAND:
- NARROW – Narrowed Ka band for more specific band setup and fewer false alerts.
- WIDE – enables detection of the whole Ka band.
- OFF – disables Ka band detection.
KA BAND 34.0: ON/OFF
KA BAND 34.3: ON/OFF
KA BAND 34.7: ON/OFF
KA BAND 35.5: ON/OFF
KA FILTER: HIGH/NORMAL/OFF
MRCD*: ON/>OFF
MRCT*: NARROW/WIDE/OFF
MR FILTER*: HIGH/LOW/OFF
- This options only when MRCD or MRCT is activated and filters out false alerts of cars that use a blind-spot assistant or adaptive cruise control. When the MR Filter function is active, detector sensitivity to MRCD/MRCT radars is slightly reduced.
GATSO RT3*: ON/OFF
GATSO RT4*: ON/OFF
PR: ON/OFF - Pulse radars detection
PD*: ON/OFF - Phodar radars detection
REDFLEX (BETA)*: ON/OFF
LASER DETECTION: ON/OFF - Selecting “ON” opens additional settings of the optional laser accessory.
- *These radars can only be detected and are only available in the menu when a GENEVO HDM+ antenna is connected.
LASER PROTECTION SETTINGS:

LASER PROTECTION: Allows selection of attachable laser protection:
- LTF - LaserTrack Flare
- ALP - AntiLaser Priority
- FF - GENEVO FF
- OFF - No laser accessory
PARKING ASSISTANCE: ON/OFF (When ALP/FF is selected).
PROTECTION: OFF/DETECTION ONLY/0-9S/UNLIMITED
- Sets the protection time of the optional laser accessory. With the “DETECT ONLY” option you will be only informed about laser measurement by connected laser accessory or by the PRO II radar antenna if no accessory is connected.
LASER NAME: OFF/NO VOICE/VOICE
- When ALP is selected. Announces the name of the laser during the warning.
GPS POINT ALERT SETTINGS:

ALERT DISTANCE: 250m/350m/450m
- Setting the distance of stationary speed cameras, section speed cameras, dangerous spots and your own GPS points. Red-light cams are set at 250m.
OVERSPEED: -5 km/h to +15 km/h.
- Setting of possible speeding without warning.
SPEEDCAM: ON/OFF
AVERAGE SPEEDCAM: ON/OFF
RED-LIGHT CAM: ON/OFF
DANGEROUS SPOT: ON/OFF
USER AREA: ON/OFF
LOCKOUT THE FALSE ALERT LOCATION:
- During an alert, by long pressing any button, suppress the false alert location.
ADD YOUR OWN GPS POINT:
- Long press any button to add your own GPS point.
ADDITIONAL MENU INFO

SPEEDMETER - LEGALIZATION FUNCTION:
This feature is used to legalize the device for use in countries where the radar detectors are prohibited. The detector stops alerting to radars and lasers. Only your current speed will appear on the display and all radar and laser detection settings will disappear from the menu. When entering the radar settings submenu, a notification of deactivated functions will appear.
To activate the Speedmeter, the detector must be turned ON, hold down the “brightness control” and “change sensitivity” buttons simultaneously for 5 seconds. Option SPEEDMETER 1 will appear on the display, if you hold the buttons longer, you can select a second mode SPEEDMETER 2, with a classic display layout.
To deactivate the speedmeter function, it is necessary to update the detector in the usual way and all functions will be fully functional again, for help with updating continue to page 15.
DATABASE UPDATES:
It is recommended to update the GPS database once a month. The detector can be updated in two ways:
- 1. Simply online for WIN and MacOS at: genevoupdate.com
- 2. By downloading the updater software for Windows OS at: genevo.com/en/updates
On these websites, you will find help on how to update and also a newsletter form, so we will keep you informed about every newly released update.
GENEVO PRO II CONNECTION SCHEME:
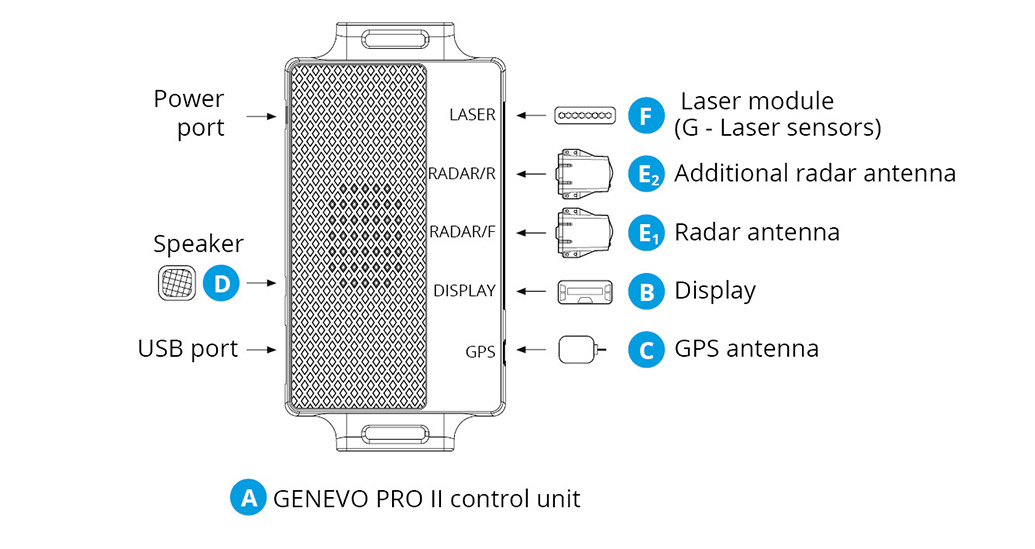
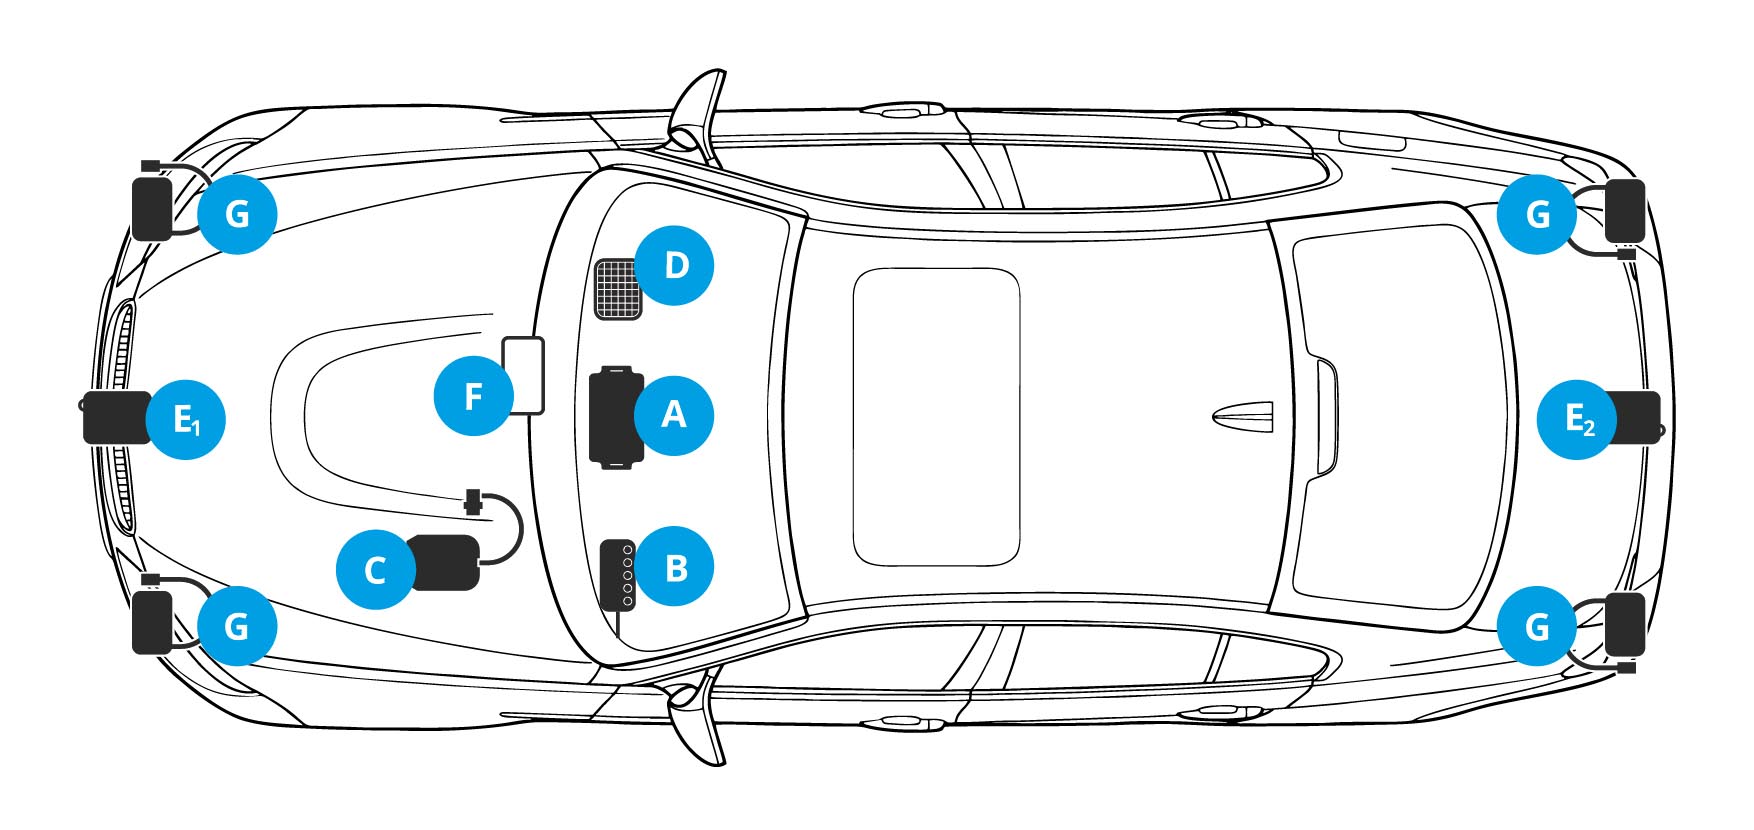
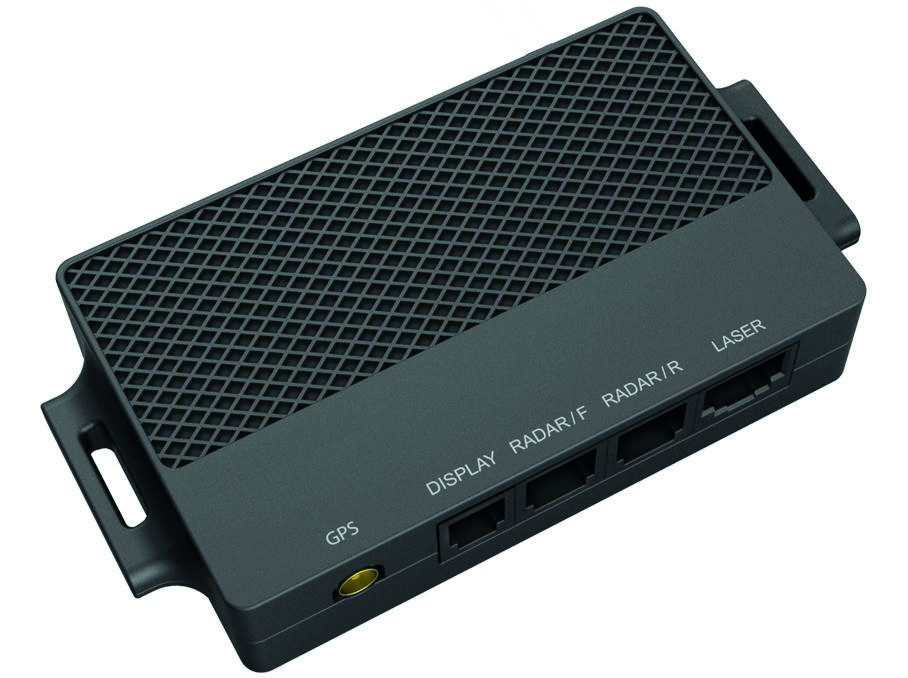
A) GENEVO PRO II CONTROL UNIT
The Control Unit is usually placed in a fuse box, or in a space above pedals, using a stripping tape, or double-sided sticky tape. For connecting individual components follow the markings on the control box. All can be easily done thanks to plug-in connectors. When connecting individual accessories please mind the plug you are trying to connect the cables into, as they must be connected to a correct plug, in case it isn’t the system might not work properly or be permanently damaged. Also, be mindful of placing the control unit so that the speaker on top of it is placed facing in free space.

B) DISPLAY
The display is usually placed in the vehicle cabin on your consideration using double-sided sticky tapes, or magnetic tape. We recommend placing the display in an easily accessible area.
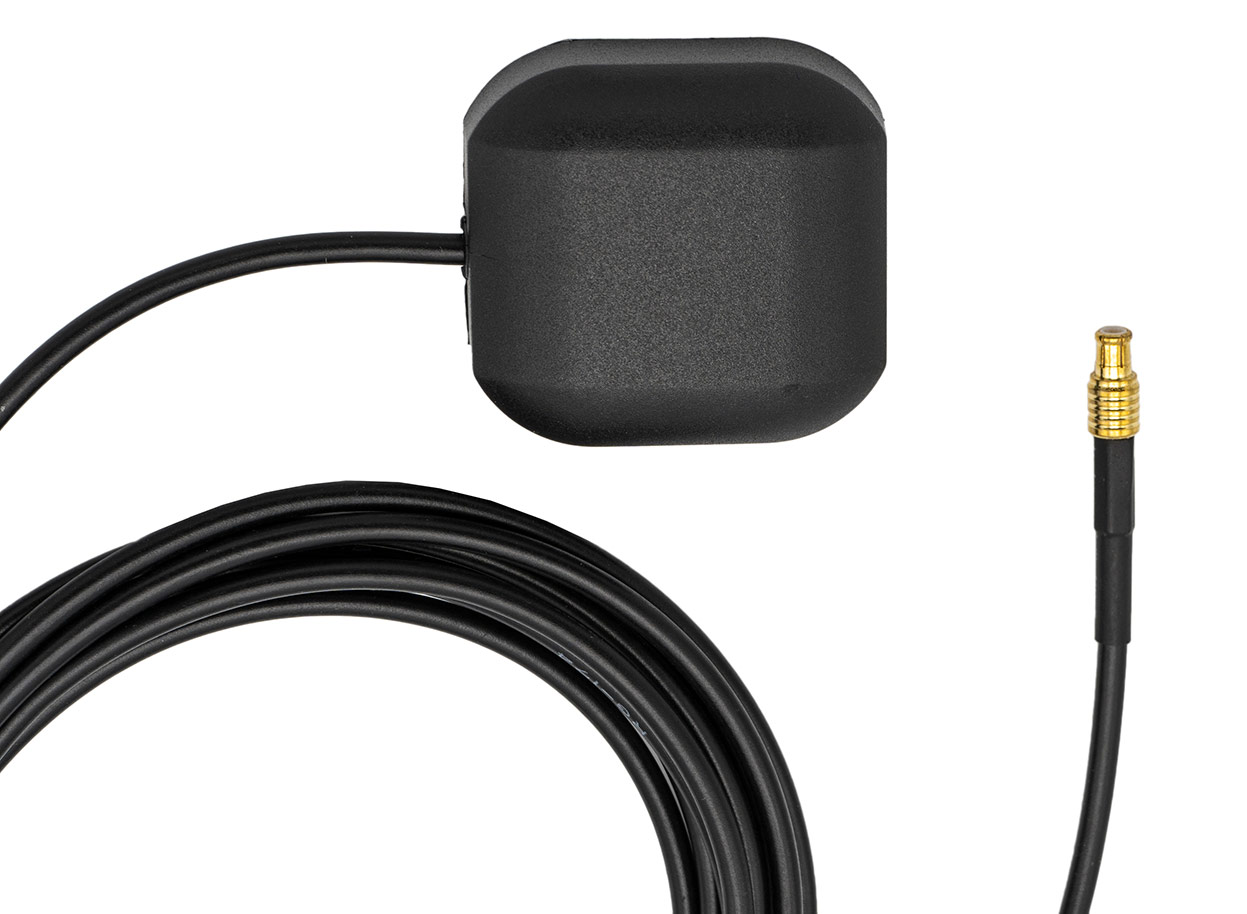
C) GPS ANTENNA
Secure the GPS antenna with a suitable sealant or double-sided adhesive tape to ensure directing the antenna at the sky. We recommend positioning it on the dashboard of the vehicle. If you place the GPS antenna under the instrument panel, the antenna must not be overshadowed by metal elements (beware of metal-plated and heated windshields). you can check the antenna’s functionality on the display. If the GPS icon glows constantly, it means it works as intended, in case it’s blinking it means that it can not find a GPS signal. It can take up to 12 minutes for the first time to fix the GPS signal.
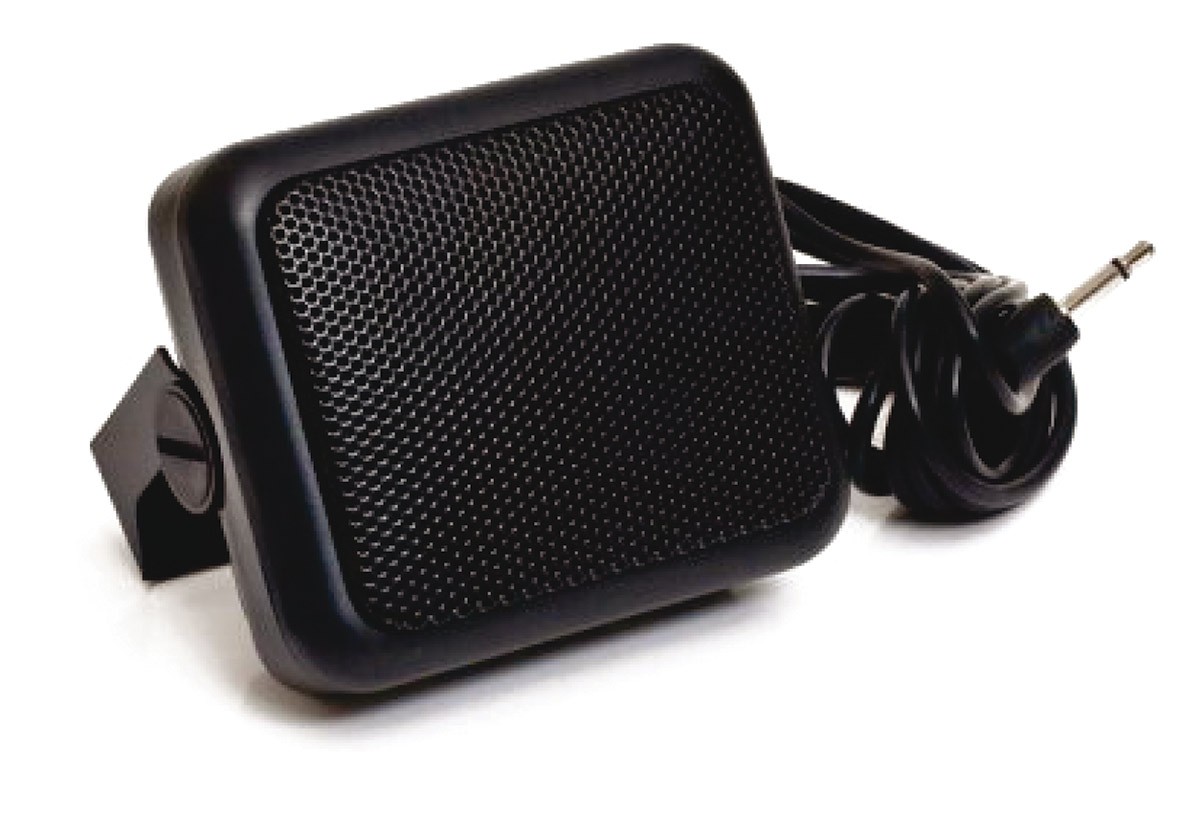
D) SPEAKER
The signaling speaker should be placed somewhere in the leg-space of the driver, or passenger. Select the location of the speaker so that the alerts can be heard clearly.

E) RADAR ANTENNA HD+ / HDM+
The radar antenna is highly sensitive equipment that can detect multiple types of police radar signals. The correct installation is crucial to its proper functionality and good sensitivity of the detector. The antenna is mounted to the front of the car, usually behind its plastic bumper or behind the front grille in front of the vehicle radiator. It must be installed in the place from where the front part has a good view of the road ahead.
It is ideal to locate the antenna into the bumper vent, 30-50 cm above the ground. If you choose to mount the antenna so that the bumper covers its front part, check the material from which the bumper is made and whether it contains a metal reinforcement. Some types of plastic can weaken radar waves and reduce the efficiency of the detector. Never mount the antenna behind metal parts of the vehicle! When installing the antenna, you can use self-tapping screws in places where the nut can be attached from the other side, as well as classic nut bolts. After selecting a suitable location for the antenna and the type of screws, drill two to four screw holes. It is recommended that the antenna is attached with 4 screws. The antenna cable can be slightly bent. Firstly, attach the antenna with two screws crosswise against each other and tighten them partly, then mount the remaining two screws.
In some vehicles, it is advisable to carry out the installation using a special support plate that is included in the packaging. It has the shape of the letter “L” and is made of a thick steel plate with pre-drilled holes. Firstly, screw the support plate to the appropriate place, and then attach the antenna to the plate. In addition, keep the antenna as far away as possible from heat sources such as the engine radiator and air conditioner from which the antenna may heat up. Failure to observe a sufficient distance will not guarantee proper operation and may cause the antenna to overheat due to increased temperature.
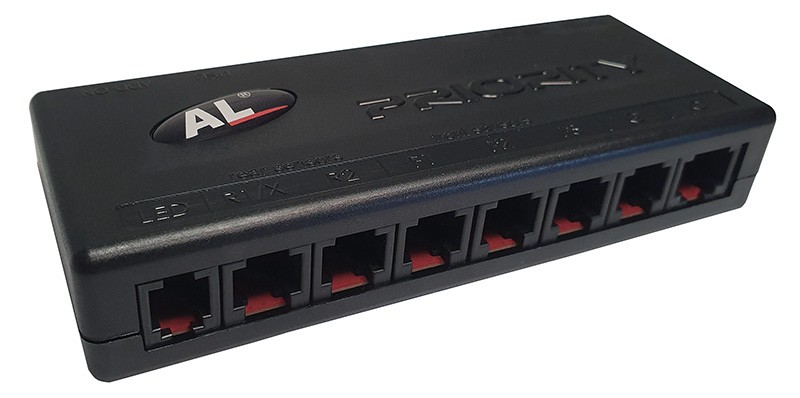
F) LASER SYSTEM CONTROL UNIT
The laser system control unit is installed in the interior of the vehicle, either under the dashboard or someplace similar to the GENEVO PRO control unit. The only important thing is that the control unit must not get into contact with water. Connect the control unit power cord to the control unit using the dedicated pins. NOTE: 1A fuse is placed inside the control box. If you require an extra fuse it can be installed on the cables (not necessary).
After the laser system control unit is connected to the GENEVO PRO control unit, connect the sensors into one of the “F” slots for front sensors, or “R” slots for rear sensors. In case you use multiple sensors connect into the dedicated slots.

G) LASER SENSORS
Laser sensors can be mounted on the front of the vehicle in the front grill, above the bumper or in the rear of the vehicle. Be extra careful to not damage the wiring, sensors, or connectors during the installation, as it will void the product warranty. To ensure cleaner looks of your vehicle we recommend using plexiglass „Perspex” to hide the sensors behind it. For more information about Perspex glass please contact your distributor. To drive the cables to the fuse box, please use the original cable pass. In case there is not enough space you will need to drill an extra hole for the connector and the cable. Be extra careful again not to damage the cables or other car parts. After you finish the cable installation, you should seal the gap using silicon or other fillings to prevent water and humidity from entering the vehicle. Check the cable if it’s long enough to reach the desired place. The sensor cable is 1 m long, the control box cable is 4 m long. A total of 5 meters of cable can be extended with an extension cable (optional accessory) for another 2.5 meters. When extending the cables, use shrink tape with a heat gun to achieve moisture tightness.
Place the sensors so that they have a clear view to the front or the rear using the included holders and double-sided duck tape. If necessary, you can bend the holder into required position. Make sure that the sensor is held firmly and can withstand vibrations caused by driving and is still in horizontal front/rear facing position.
OPERATING FREQUENCY:
GPS: SiRF STAR IV
Ka narrow: 34.0 GHz, 34.3 GHz, 34.7 GHz, 35.5 GHz (±120 MHz)
Ka wide: 33.4 GHz - 36.0 GHz
K narrow: 24.125 GHz (±70 MHz)
K wide: 24.125 GHz (±150 MHz)
Laser: 904nm
Pulse radar (PR): Vizir, Iskra, etc.
3D radars with HDM+ antenna:
MultaRadar: CD/CT
GATSO: RT3/RT4
Stalker Phodar (PD)
Redflex (BETA)
TECHNICAL PARAMETERS:
Operational temperature: -20 °C to +85 °C
Storage temperature: -20 °C to +85 °C
Operational voltage: 11 - 24 V DC
Power consumption: 250 mA normal, 330 mA max (at 12 V)
Control unit dimensions: 110 mm x 54 mm x 20 mm
Display dimensions: 75 mm x 31 mm x 18 mm
Power Input: Pmax= 3.96 W
Connector polarity: Positive
Power supply fuse: F2A/250V
ADDITIONAL INFORMATION:
We recommend that the installation of the device be carried out only by assembly centers trained by the manufacturer. For information on available service centers, contact your dealer.
Restrictions on placing in service or applicable requirements for permission to use: Country: AT, BG, CY, DE, DK, EE, ES, FI, FR, GR, IR, IT, LT, LU, LV, MT, NL, PL, PT, SE, SK
Requirements: Please check your legislation before use.
If you wish to discard electrical and electronic equipment, please contact your dealer or supplier for further information.
Before using the device, check the legislation in the country of use. If you wish to dispose of electrical and electronic equipment, please contact your dealer or supplier for further information.
Use the device only in accordance with the user manual. Do not use the device if it is damaged!
CE - DECLARATION OF CONFORMITY
The manufacturer, GENEVO s.r.o., hereby declares that GENEVO PRO II equipment complies with the essential requirements and other relevant provisions of Directive 2014/53/EU. The full Declaration of Conformity canbe downloaded here: www.genevo.com/en/e-pro.pdf
HOMOLOGATION
GENEVO PRO II was grated a homologation of a type of electrical / electronic sub-assembly with regard to Regulation No. 10.
EXPLANATORY NOTES:
Radar frequency bands: Different radar bands are used to measure speed, most often Ka, K, or newer MultaRadars and GATSO Radars that have extremely low transmit power and are hard to detect. Different bands and frequencies are used in each country, it is therefore necessary to have the detector set up correctly for each country. Recommended settings for European countries can be found at: Support - Recommended settings
- Ka - One of the most commonly used radar band for speed measuring.
- K - The most widely used band at all, is comonnly used for automatic doors at petrol stations and shops, adaptive cruise control, etc. Devices operating in the K band cause false alerts, so their quality filtration is essential.
- X – Minimally used band, mainly insome Eastern European countries.
- CD/CT MultaRadars - Modernradars used in Austria, Iceland, Netherlands, Poland, Portugal, Slovakia, Spain.
- DAHUA - Modulated 3D K band based radar with extremely low power output.
- GATSO radars - Another modern radars, they can be stationary or mobile. They are used in Belgium, France, Finland, Great Britain, Lithuania, Netherlands, Slovenia. They are divided into RT2/RT3/RT4 - a higher number means a more modern version. The detection of these radars is possible only by the latest and most sensitive detector.
Wide: Broadband mode, on the other hand, searches for example the entire Ka band from 33.4 GHz to 36.0 GHz. Use this setting only if absolutely necessary, as it shortens the detection distance and increases the number of false alerts.
Filters and false alerts: For the correct functioning of the detector, it is essential to filter unwanted radar signals from sources other than police radars (eg adaptive cruise control of modern vehicles), so that the detector reports only police radars. The filter settings are further described on page 7 in the manual (ALERTS NOTIFICATION SETTINGS).
Laser measurement: Laser speed measurement is based on emitting an ultra narrow and short-time beam of electromagnetic light at the level of infrared radiation. The signal is transmitted for a very short time at a specific place (usually car’s licence plate) and therefore, it is almost imposible to detect it in advance. The only effective protection against laser speed measurement is an additional active laser system.
GPS: Laser speed measurement is based on emitting an ultra narrow and short-time beam of electromagnetic light at the level of infrared radiation. The signal is transmitted for a very short time at a specific place (usually car’s licence plate) and therefore, it is almost imposible to detect it in advance. The only effective protection against laser speed measurement is an additional active laser system.
Version: 2023-10-24
Manufacturer: GENEVO s.r.o., Radèina 497/22, Liboc, 161 00, Praha 6